
Lesson 3: Importing Bill Data into Your Metrix Project
Lesson 3 covers importing bill data from text files. Some Metrix users get their data in electronic format. Rather than retyping the data into Metrix, they reformat the data and import it into the program.
MT1 File Format
The utility bill data has to be formatted in a certain way in order to import into Metrix. MT1 files are Comma Seperated Value (CSV) files. To create an MT1 file using Excel just create a new worksheet and fill in the columns according to the values in the table below. Make sure that the worksheet doesn’t have any headers, just values.
Some restrictions that should be noted:
1. No commas should be in any field.
2. No dollar signs.
3. First 10 columns must have data.
4. The name and account fields must be less than 22 characters.
5. Fields with no value should be left blank (rather than filling them with 0).
6. Files should be saved with an mt1 extension in the filename.
Here are descriptions of all the fields in an MT1 file:
| Col | Col | Column Name | Field Value/Data Source | Format |
| 1 | A | Format ID | MT1 | |
| 2 | B | Meter Name | Meter Name | Up to 22 characters |
| 3 | C | Account # | Account number | Up to 22 characters |
| 4 | D | Utility | Default value per appendix sent by” src Systems. | One alphanumeric character |
| 5 | E | BTU/unit Factor | How many Btus in the Energy Unit, i.e. there are 3413 Btus in a kWh | 3413 |
| 6 | F | BTUH/unit | How many Btuhs in the Energy Unit, i.e. there are 3413 Btuhs in a kW | 3413 |
| 7 | G | Year | Meter read date year | 1999 |
| 8 | H | Month | Meter read day month | 3 |
| 9 | I | Day | Meter read date day | 5 |
| 10 | J | Number of days | Bill days quantity | 29 |
| 11 | K | Total Cost | Billed amount for the account. | 123456.78 |
| 12 | L | Miscellaneous | ||
| 13 | M | Credit | ||
| 14 | N | Tax | ||
| 15 | O | On Peak Quantity Cost | ||
| 16 | P | On Peak Quantity | ||
| 17 | Q | Off Peak Quantity Cost | ||
| 18 | R | Off Peak Quantity | ||
| 19 | S | Partial Peak Cost | ||
| 20 | T | Partial Peak Quantity | ||
| 21 | U | Super Off Peak Cost | ||
| 22 | V | Super Off Peak Quantity | ||
| 23 | W | On Peak Demand Cost | ||
| 24 | X | On Peak Demand | ||
| 25 | Y | Off Peak Demand Cost | ||
| 26 | Z | Off Peak Demand | ||
| 27 | AA | Partial Peak Demand Cost | ||
| 28 | AB | Partial Peak Demand | ||
| 29 | AC | Super Off Peak Demand Cost | ||
| 30 | AD | Super Off Peak Demand | ||
| 31 | AE | On Peak rkVAh Cost | ||
| 32 | AF | On Peak rkVAh | ||
| 33 | AG | Off Peak rkVAh Cost | ||
| 34 | AH | Off Peak rkVAh | ||
| 35 | AI | Partial Peak rkVAh Cost | ||
| 36 | AJ | Partial Peak rkVAh | ||
| 37 | AK | Super Off Peak rkVAh Cost | ||
| 38 | AL | Super Off Peak rkVAh | ||
| 39 | AM | On Peak Power Factor Cost | ||
| 40 | AN | On Peak Power Factor % | ||
| 41 | AO | Off Peak Power Factor Cost | ||
| 42 | AP | Off Peak Power Factor % | ||
| 43 | AQ | Partial Peak Power Factor Cost | ||
| 44 | AR | Partial Peak Power Factor % | ||
| 45 | AS | Super Off Peak PF Cost | ||
| 46 | AT | Super Off Peak PF % |
Columns for MT1 Format
To properly save the file in Excel, save the file with the type “Comma Seperated Values”, but type the filename inside quotes with .mt1 appended to it so that Excel saves the file using the correct extension. For example, in the filename dialog, you can name your file “mybilldata.mt1”.
Entering Billing Data
Once each Meter has been set up, we are ready to import billing data. The data from the utility bills (usage and costs) comprise the Actual scenario in Metrix.
Note:When importing a *.mt1 file, the file must be in a particular format. For more information, see the section above regarding import file formats.
1. Select the “Primary Elec” Meter Item to display its data form.
2. Then select the Register tab to display the Bill Register so it can be confirmed empty. The natural gas Bill Register is also empty.
3. The electric meter in this sample measures consumption (kWh) and demand (kW), but not reactive energy or power factor. There is no time-of-use differentiation. In the “# TOU” area (top left of the form), for both Consumption and Demand, enter 1, for 1 time-of-use period. Select the Detailed Cost check box because our sample bills will break out costs for kWh and kW. For RkVAh and Power Factor, 0 (zero) must be entered. The Detailed Cost check box for RkVAh must be cleared also. Now select the “Primary Gas” Meter and select the Register Tab. There is only one time of use period for consumption (therms) in the gas meter, so enter 1 for consumption and select the Detailed Cost check box. Set the other TOU periods to 0 including demand, and make sure the Detailed Cost check box is also cleared.
4. From the Tools menu, choose Import Data. From the Files of Type list, select Bill Data | Import Files, *.mt1. Select the files gulfhist.mt1 and gulftrak.mt1 and click OK.
5. If alerted with a pop-up message the import was successful, click OK. As illustrated by Figure 2.19, the historic electric bill data is now entered. The historic natural gas bill data has also been entered, since it was also included in the gulfhist.mt1 and gulftrak.mt1 files.
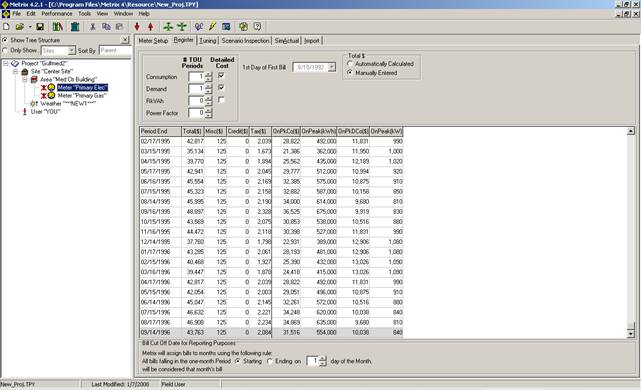
Figure 2.19: Historic Electric Bill Data
Note:In setting up the electric and gas meters, the names and accounts were entered which exactly matched those found in the gulfhist.mt1 and gulftrak.mt1 files. If exact matching names or accounts had not been entered, Metrix would have displayed a list of meters in the .mt1 import files that did not match any meters in the Project. Import meters could have then been assigned to Project meters, or been added as new meters.
If the data was imported properly, skip to the section on importing weather data. Otherwise, continue on, as we cover what to do when problems importing data are encountered.
6. If the data entered did not match successfully, the data form shown in Figure 2.20 will come up. This form appeared because the wrong meter name, account number or fuel type was accidentally entered. Remember that when importing data, Metrix requires the meter name, account number and fuel type in the data forms match exactly what is in the import file. If they do not match, it will be necessary to indicate which Import Meters go into the legacy Meters in your Project. In Figure 2.20, we are assuming that the gas meter was incorrectly entered into the Metrix project, and the electricity meter was correct.
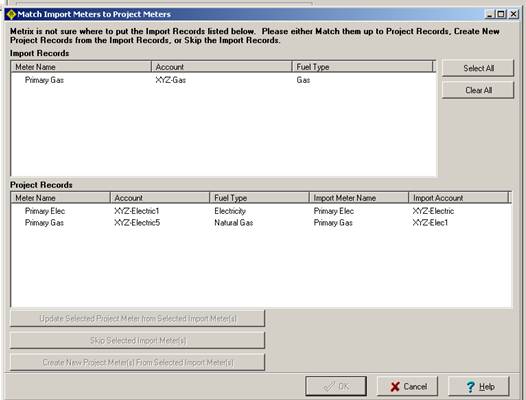
Figure 2.20: Match Import Meters to Project Meters
7. The Meters listed on the left are the Meters in your Project. The Meters listed on the right are the Meters in your Import File that Metrix does not know what to do with. There were actually 2 Meters in the Import File, but Metrix figured out what to do with the Electric Meter, since the Meter Name, Account Number and Fuel Type matched. Note the mistake above, where we have the wrong name for the account number for the Gas meter.
8. Highlight the Primary Gas Meter on the top, as this is the meter needed to map into Metrix. Now highlight the Primary Gas Meter on the bottom, as this is the Project Meter to which we are associating the Import File Meter.
9. Next, click on the large button Update Selected Project Meter from Selected Import Meter(s).
10. Click OK. Now your data will be imported into Metrix, and the associations just made in this form will be recorded, so that next time, it will not query the entries. (Note that only the meter name, account number, and import utility on the Import tab will be updated to match the data being imported. The meter name, account number, and utility indicated on the Meter Setup tab will remain unchanged.)
Weather Data
If comparing data from year to year, and there are no plans regarding meter tuning for weather, then no weather data is required. The only benefit of weather data for annual comparisons is that reports can be made showing degree-days, which might be instructive.