
Lesson 8: Useful Features in Metrix 4
This lesson will take us on a tour of some useful features in Metrix 4 not covered in Lesson 1.
Topics:
List View
Up and Down Arrows
Changes to the Tuning Form
First, let’s take a look at the tuning screen. Open the Primary Elec Meter, and click on the Tuning tab. Your screen should look like Figure 2.29:
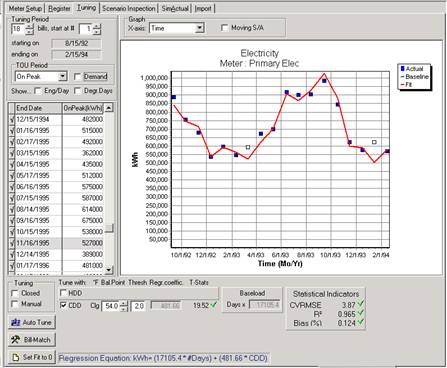
Figure 2.29: Metrix 4 Tuning Tab: Primary Electric with Time X-Axis
This replaces the form in Metrix 3, as Figure 2.30 is shown on the following page:
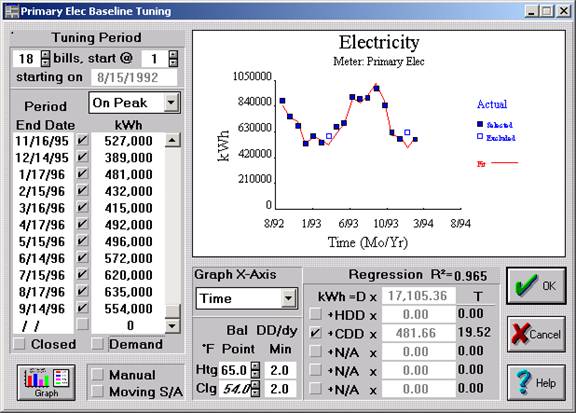
Figure 2.30: Old Metrix 3 Tuning Form: Primary Electric with Time X-Axis
All of the old controls and statistics from Metrix 3 are in the new Tuning form. They have been rearranged to make the form easier to understand.
Notice at the bottom of the tuning screen, we have placed the Regression Equation so that it is clear.
On the right of the Metrix 4 Tuning Form, two statistical indicators, the CVRMSE and the Mean Bias Error have been added. Now all three indicators can be evaluated during tuning. In Metrix 3, the CVRMSE and the Mean Bias Error were located only in the tuning report.
We have hidden unnecessary fields in the tuning form. In Metrix 3, the Heating Balance Point, T statistic, Coefficient and Degree Day per Day Threshold, were seen, whether tuning to HDD or not. This cluttered up the tuning form, and confused new users. Now, only information relating to HDD will be seen if the HDD checkbox is activated.
All the graphing controls have been gathered into one place, which can be seen in the graph above.
We’ve added the ending on date to the starting on date to help better indicate the period that is being tuned.
In addition, next to all statistical indicators, green checkmarks or red X’s are displayed. The green checkmark signifies that your tuning meets the tuning criteria. Red X’s indicate that your tuning does not meet the associated criteria.
We have also added a feature, which shows how many CDD’s and HDD’s are associated with each bill based upon your balance point. To see this, check the “Show Deg Days” checkbox, which is located on the left above the listing of bills. By checking the “Show Eng/Day” checkbox, energy usage per day can be viewed as in Figure 2.31:
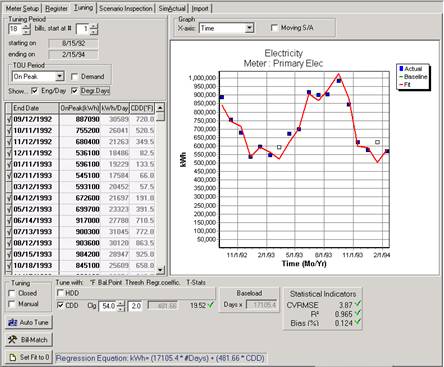
Figure 2.31: Showing Energy Per Day and Degree Days in the Tuning Form
To retrieve the usage per day or degree day information from the tuning screen, select whatever values are desired, and press control-C on your keyboard to copy it. Then in Excel or Word, press control-V on your keyboard to copy it.
Bill Matching
Bill Matching has been greatly simplified. If a meter cannot be tuned, or there is no need to tune it, bill matching has been streamlined by pressing the Set Fit to 0 button, and then pressing the Bill-Match button. Metrix will automatically add a bill matching modification when this is done.
Automatic Tuning
A meter can be tuned automatically by pressing the AutoTune button. When this button is activated, Metrix will automatically tune your meter more than 80 different ways, finding the best tuning based upon your tuning criteria. Metrix may ask if you want it to change the bills that have been selected or deselected. If allowed to do so, Metrix may deselect several points. Although Automatic Tuning performs well most of the time, occasionally some of the data is interpreted such that the outcome does not yield optimal tuning. When using Automatic Tuning, an engineering professional should evaluate the results to make sure that they fall within acceptable parameters and make any necessary changes.
Tuning Preferences
When operators tune their meters, they are not typically tuning on one criterion alone, but rather apply a sort of fuzzy logic incorporating several factors. In order to incorporate your thinking into Metrix Automatic Tuning, use the Tuning Preferences data form. With this, Metrix can be told which factors are important when tuning meters, and the relative importance of each value entered. Metrix will then weigh the different factors using your weightings to determine the optimum tuning.
Using the Metrix Menu, select Tools | Options. Then select the Tuning Preferences tab. The frame in Figure 2.32 will come up:
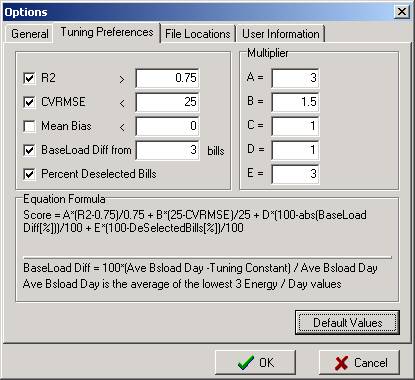
Figure 2.32: Tuning Preferences
Tuning Preferences instruct Metrix how to automatically tune your meters. When Metrix Auto Tunes your meters, it computes over 80 combinations of balance points and variables. Metrix will then select the tuning with the best score, as defined in the Tuning Preferences data form. The computation that results in the highest “Equation Formula” becomes the tuning that Metrix deems best when automatically tuning your meter.
Checking the boxes on the left indicate that the criteria listed next to them is to be used in the “Equation Formula.” The Multipliers on the right give a weighted value to each of the different criteria. By weighting the R2 with a 3 and the CVRMSE with a 1.5, Metrix interprets that the R2 value is 2x more important than the CVRMSE term and 3x more important than the “BaseLoad Diff” term.
If Auto Tuning to R2 only, then your form might look Figure 2.33:
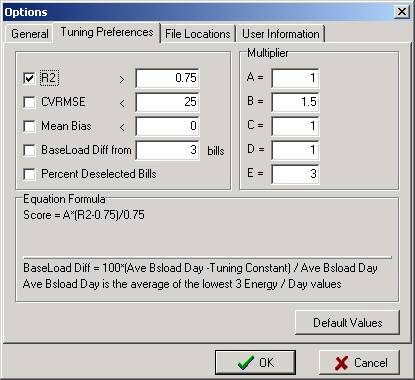
Figure 2.33: R2 Tuning
Some Metrix operators compare the BaseLoad term in Metrix to the usage from the lowest 2 or 3 bills. The thinking is that the regression can be anchored to solid statistics, which are the non-weather sensitive usage. To do so manually, take the average of the three lowest bills in the tuning period, and divide by the number of days in that period. Then toggle the balance point until the tuning constant matches this value. A deeper discussion of R2 tuning and Baseload will be conducted later.
Project Preferences
In the Project Item, there are two data forms that relate to tuning. The first is Project Preferences shown in Figure 2.34 below. The controls are described in Table 2.1.
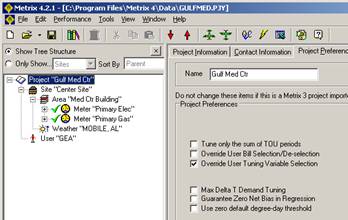
Figure 2.34: Project Preferences
Table 2.1: Controls and Functions
| Control | What it Does | Why | ||
| Tune only the sum of TOU periods | Allows Metrix to Tune the Sum of TOU periods rather than TOU periods independently. | Many Metrix users in the past found that although total usage might tune well, the individual TOU periods did not. | ||
| Override User Bill Selection/Deselection | When autotuning, Metrix will override which bills have been selected or deselected in order to get the best fit. | So that Metrix can explore all possibilities to find the best fit. | ||
| Override User Tuning Variable Selection | When automatically tuning, Metrix will determine which are the best variables to tune with. | So that Metrix can explore all possibilities to find the best fit. | ||
| Max Delta T Demand Tuning | When checked, rather than tuning demand to average temperature in a billing period, Metrix will tune to the Maximum temperature in a billing period (when tuning for cooling) or the Minimum temperature in a billing period (when tuning for heating). | It makes more sense theoretically to tune to maximum or minimum temperature when setting demand, rather than average temperature. | ||
| Guarantee Zero Net Mean Bias in Regression | When checked, Metrix will shift the regressions up or down to guarantee zero net mean bias. | Users frequently want to have 0 Net Mean Bias Errors in their fit lines. | ||
| Use zero default degree day threshold | When checked, un-tuned meters’ DD/Day thresholds will default to 2 rather than 0. | In Metrix 3, the DD/Day Threshold defaulted to 2, even though best tunings were typically made with it being 0. |
There are also controls in the Tuning Requirements data form as shown in Figure 2.35.
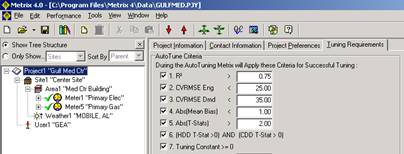
Figure 2.35: Tuning Requirements
The tuning requirements are the criteria that are used when determining whether a tuning is “good enough” and warrants a green checkmark. If the tuning does not meet the criteria in the tuning requirements form, a red checkmark aside the statistical value will appear. In addition, if all tuning requirements are met, a green checkmark will appear beside the meter in the tree diagram.
Copying and Pasting Data Into and From Excel
Data can be copied and pasted from any register into Excel. Data from Excel can also be copied and pasted into Metrix’s bill register, as long as it does not include dates. Dates cannot be pasted into Metrix.
Scenario Inspection
In Metrix 3, if a Meter form in the Modifications View was opened, Baseline Data was displayed. If opened in the Measures View, Target Data was shown. If it was opened in the Rates View, SimActual Data was on the screen. We have since combined these forms into the more user-friendly Scenario Inspection data form.
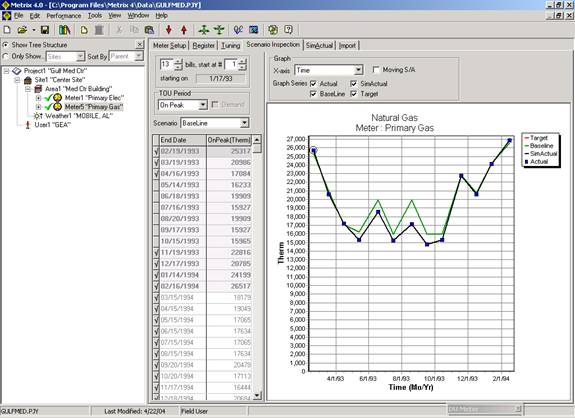
Figure 2.36: Scenario Inspection Data Form
In the register to the left of the graph, the desired scenario of data to be seen in the register can be selected. And, as in all registers, the data can be copied and pasted from Metrix to Excel.
Above the graph, there are controls that describe what will appear in the graph. Desired scenarios to view in the graph, and the displayed variable in the x-axis can be seen here.
In addition, the graph can be changed from line to bar to point graph by right clicking on the graph and selecting “series style” from the menu.
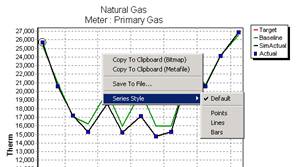
Figure 2.37: Changing Series Styles
The graph can be saved as a bitmap or metafile, or copied to a clipboard for pasting into other applications. Right clicking on the graph will provide these options.
Fast Cycling Through Items
If several forms of the same item type need to be opened for viewing or entering changes, instead of selecting each item from the list view or the Tree Diagram, it’s easier and faster to click on the red down (or up) arrow tools. ![]() This allows cycling through each item, one by one.
This allows cycling through each item, one by one.