
Lesson 3: Importing Bill Data into Your Option C Project
Lesson 3 covers importing utility data into Option C. Some users get their data in electronic format. Rather than retyping the data into Option C, they reformat the data and import it into the program, using the MT1 file format.
MT1 File Format
Utility bill data must be formatted in a certain way in order to import into Option C. MT1 files are Comma Separated Value (CSV) files. To create an MT1 file using Excel, just create a new worksheet and fill in the columns according to the values in the table below. Make sure that the worksheet doesn’t have any headers, just values.
Some restrictions that should be noted:
1. No commas should be in any field.
2. No dollar signs.
3. First 10 columns must have data.
4. The name and account fields must be less than 22 characters.
5. Fields with no value should be left blank (rather than filling them with 0).
6. Files should be saved with an mt1 extension in the filename. (Or, renamed with the mt1 extension in Windows Explorer, after saving as .csv.)
Columns for MT1 Format
Here are descriptions of all the fields in an MT1 file:
| Col | Col | Column Name | Field Value/Data Source | Format |
| 1 | A | Format ID | MT1 | |
| 2 | B | Meter Name | Meter Name | Up to 22 characters |
| 3 | C | Account # | Account number | Up to 22 characters |
| 4 | D | Utility | Default value per appendix sent by” src Systems. | One alphanumeric character |
| 5 | E | BTU/unit Factor | How many Btus in the Energy Unit, i.e. there are 3413 Btus in a kWh | 3413 |
| 6 | F | BTUH/unit | How many Btuhs in the Energy Unit, i.e. there are 3413 Btuhs in a kW | 3413 |
| 7 | G | Year | Meter read date year | 1999 |
| 8 | H | Month | Meter read day month | 3 |
| 9 | I | Day | Meter read date day | 5 |
| 10 | J | Number of days | Bill days quantity | 29 |
| 11 | K | Total Cost | Billed amount for the account. | 123456.78 |
| 12 | L | Miscellaneous | ||
| 13 | M | Credit | ||
| 14 | N | Tax | ||
| 15 | O | On Peak Quantity Cost | ||
| 16 | P | On Peak Quantity | ||
| 17 | Q | Off Peak Quantity Cost | ||
| 18 | R | Off Peak Quantity | ||
| 19 | S | Partial Peak Cost | ||
| 20 | T | Partial Peak Quantity | ||
| 21 | U | Super Off Peak Cost | ||
| 22 | V | Super Off Peak Quantity | ||
| 23 | W | On Peak Demand Cost | ||
| 24 | X | On Peak Demand | ||
| 25 | Y | Off Peak Demand Cost | ||
| 26 | Z | Off Peak Demand | ||
| 27 | AA | Partial Peak Demand Cost | ||
| 28 | AB | Partial Peak Demand | ||
| 29 | AC | Super Off Peak Demand Cost | ||
| 30 | AD | Super Off Peak Demand | ||
| 31 | AE | On Peak rkVAh Cost | ||
| 32 | AF | On Peak rkVAh | ||
| 33 | AG | Off Peak rkVAh Cost | ||
| 34 | AH | Off Peak rkVAh | ||
| 35 | AI | Partial Peak rkVAh Cost | ||
| 36 | AJ | Partial Peak rkVAh | ||
| 37 | AK | Super Off Peak rkVAh Cost | ||
| 38 | AL | Super Off Peak rkVAh | ||
| 39 | AM | On Peak Power Factor Cost | ||
| 40 | AN | On Peak Power Factor % | ||
| 41 | AO | Off Peak Power Factor Cost | ||
| 42 | AP | Off Peak Power Factor % | ||
| 43 | AQ | Partial Peak Power Factor Cost | ||
| 44 | AR | Partial Peak Power Factor % | ||
| 45 | AS | Super Off Peak PF Cost | ||
| 46 | AT | Super Off Peak PF % |
Saving an MT1 File
After preparing your utility data in the MT1 format in Excel, save the file with the type “Comma Separated Values” (.csv). After saving, browse for the file in Windows Explorer, and rename the file with the extension type “.mt1” instead of “.csv”. For example, the final filename should appear as “UtilityData.mt1”.
It is now ready for import into Option C.
Importing MT1 Format Bill Data
When importing MT1 data into existing Meters in Option C, the Meter Name and Account Number fields in the MT1 file should exactly match the Meter Name and Account fields in Option C. These are found in the Meter Details tab.
If the data in an MT1 file cannot be matched to existing project meters, Option C will create new meters for the data.
In these tutorials, we have already set up our Electric and Steam Meters accordingly, so we can now import data into them.
1. Click the Import Icon, in the bottom left of Option C. In the Import Menu, select Utility File Import:
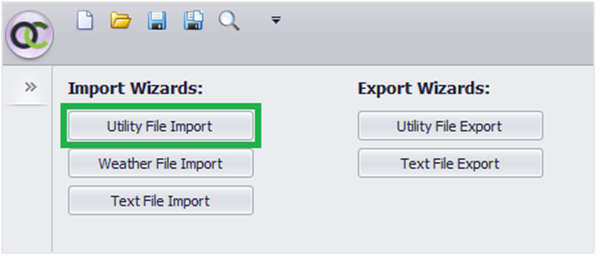
Figure 3.1: Import Menu
2. Click the ellipsis (…) under File Path, to browse for: “OC Sample Proj PreRetrofit Bills.mt1” and “OC Sample Proj PostRetrofit Bills.mt1”. (These will be located under My Documents/Option C.)
3. Select both, and click ‘Open’ to continue.
4. In the Import Menu, click Next.
5. Imported data is now matched to existing project Meters. If matches aren’t found, Option C will create new meters by default. You may view or adjust the import action, under the Action column.
6. In this example, it appears our import data did not match our project meters. Two entries are listed under the ‘Unmatched’ tab, and none under ‘Matched’:
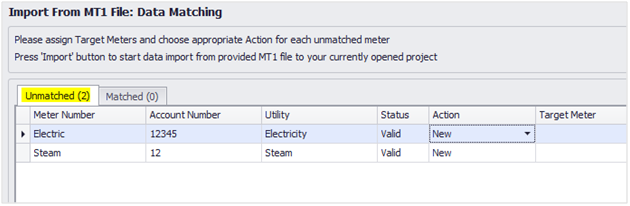
7. The default Action is set to ‘New’ – Option C will create new Meters for the data. We can manually match the import data to our target meters instead. Click on the dropdown menus under the Action column, and select ‘Import/Update’. Then click the adjacent row under the Target Meter column, to browse for the appropriate meter to update:

8. Repeat for both meters, then click ‘Import’.

9. After the confirmation screen, click ‘OK’ to return to the Import Menu.
10. Data import is complete. Click on the Project icon, to return to the Tree View, and view your updated Meters. Select your Electric Meter, and click the Bill Register tab. You should see the newly imported utility data populating the register:
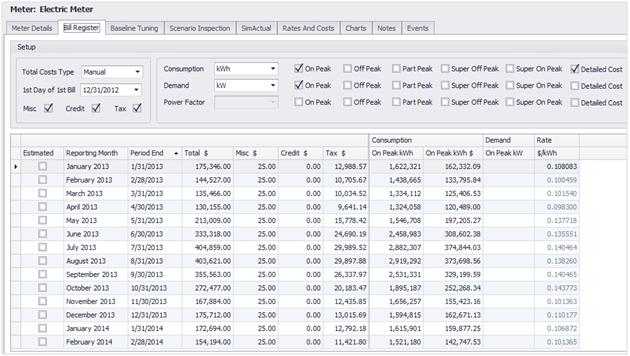
Check your Steam Meter as well.
Utility data import is now complete. In the next lesson, we will follow similar steps to import Weather data.
<--Previous lesson Next lesson–>
- Lesson 1: Getting Started in Option C
- Lesson 2: Setting up Your Option C Project
- Lesson 3: Importing Bill Data into Your Option C Project
- Lesson 4: Importing Weather Data into Your Option C Project
- Lesson 5: Tuning Your Data for Weather
- Lesson 6: Adding Measures
- Lesson 7: Adding Baseline Modifications
- Lesson 8: Reporting